Posts

Raw Green Soup

A typical raw detox lunch at Hawaii Naturopathic Retreat often consists of soup, salad, dip and/or pate, raw crackers, sprouts and fermented vegetables like pickles, sauerkraut, or kim chee.

In this recipe we are going to show you how to make a simple and amazingly easy raw green soup at home. For those in colder climates this recipe is especially refreshing to enjoy during the spring and summer months.

Once you get the hang of it you can use different types of greens and herbs to make it slightly different each time.

The base of this soup is formed from an avocado which makes it rich and creamy. Avocado is an excellent food loaded with nutrients. It is a great source of healthy monounsaturated fatty acids, potassium, fiber, vitamin K, folate, vitamin C, B5, B6, and E.

It is also good to combine the avocado with the greens in this recipe so that the fat-soluble vitamins (A, E, and K) are easier absorbed in the bloodstream when eaten with the fat from the avocado.

In this video Dr. Kelsey Becker shows you how to make this creamy, delicious soup with fresh green vegetables and herbs. The varieties you can make are endless depending on what greens you have on hand. Another way to make the soup creamy is to use zucchini.

Raw Green Soup

This raw green soup is very easy to make. It's almost like making a green smoothie, except it contains vegetables only. This soup is very hydrating, and full of nutrients with lots of vitamins, phytonutrients and minerals.
Prep Time20 minutes
Course: Soup
Keyword: Raw Food, Soup
Servings: 2 servings

Equipment

  • High Speed Blender

Ingredients

  • 1 Medium Avocado
  • 1/2 Large Cucumber, roughly chopped
  • 2 Stalks Celery, roughly chopped
  • 2 Leaves Swiss Chard
  • 3-4 Leaves Pak or Bok Choi, roughly chopped
  • 2 Green Onions, roughly chopped
  • 1/2 Packed Cup Fresh Chives, roughly chopped
  • 1/2 Packed Cup Cilantro leaves keep some aside for garnishing at the end
  • 1-2 TBSP Fresh lime or lemon juice roll the lime/lemon first to extract maximum juice from it
  • 2 cups Vegetable broth water is fine too
  • dash Himalayan salt

Instructions

  • Place all the ingredient in a blender and blend until everything has been broken down and you have the desired creamy consistency. Add more water or broth if too thick.
  • Serve in bowls and garnish with finely chopped cilantro sprinkled on top, black pepper and a light dusting of nutritional yeast (optional) and a slight drizzle of olive oil.

Notes

NOTE: You can use any fresh herbs and greens that you like or have available in your fridge to make this soup.
GARNISHING IDEAS: Sprinkle nutritional yeast on top, grind fresh black pepper on top, drizzle slightly with olive oil, sprinkle fresh herbs on top, arrange finely sliced cucumber slices on top.
TIP: Always role your citrus fruit (see video) before you cut it to extract it's juice. This will make it easy to get the most juice form it. 
Make vegetable broth using your vegetable scraps and off cuts. See recipe Vegetable Broth.
recipe for homemade vegetable broth suitable for the Gerson diet using vegetable peels and scraps

Ep #031: Eat Your Greens! Microbes Are Nothing, Terrain is Everything!

The power of green leafy vegetables goes beyond having a healthy, balanced diet. Life on earth depends on the unique ability of plants to transform the energy of the sun, air, water and earth into nutrients absorbable by animal species.

Plants produce oxygen, carbohydrates, minerals and vitamins essential to animal life on this planet. Plants recycle carbon dioxide, a waste product from our cellular respiration, into oxygen which is our number one nutrient needed to sustain life. Dr. Baylac and Ian discuss the importance of greens and the relationship to the health of our planet and ultimately, the health of us all.

Tune in to join the conversation about designing a lifestyle and acquiring a mindset that promote a long, healthy and happy life.

LISTEN TO THE SHOW


Podcast: Download

Subscribe: iTunes | Stitcher

RESOURCES & LINKS

How to Use More Greens in Your Diet

Join us for a healthy vacation in Hawaii. Book anytime. Private rooms and bathrooms with own private entrance. Large property for social distancing. Choose from water fasting, juice fasting and wellness detox packages.


healthy vacations in Hawaii, Thanksgiving 2019 Kealakekua Bay

Vegan Raw Basil Pesto Sauce

Pesto is a traditional Italian dish. It is an uncooked sauce made from fresh Italian basil. Having freshly made basil pesto on hand gives you lots of flexibility for use as you prepare delicious healthy meals. If you store the pesto in a glass jar with a tight lid, it will keep fresh in the fridge for up to five days.

You may have noticed that of all fresh herbs, basil leaves are the ones that turn dark brown and go off the fastest in the fridge. Preparing a freshly made basil sauce is great way to be sure to use the entire bunch of basil at its freshest.

In this video Dr. Baylac shows you how to prepare a basic vegan pesto using a mini food processor (the recipe follows below).

Traditionally Italian basil pesto is made with olive oil, pine nuts, garlic, basil, salt, lemon juice and dry aged cheese like Parmesan. Of course, we omit dairy from our recipes as it’s pro-inflammatory and a common food allergen.

Here are several suggestions for using the delicious, freshly made basil pesto sauce:

  • On noodles or pasta. We recommend spiralized zucchini or cucumber noodles or kelp noodles. You can find kelp noodles in the refrigerator section of a health food store.
zucchini noodles made with a spiralizer

Zuchinni noodles make in a spiralizer

Kelp noodles

Kelp noodles


  • On roasted, baked or steamed vegetables. Simply bake or steam some vegetables. Think crimini or portabello mushrooms, eggplant, zuchinni, cauliflower, tomatoes, red or yellow sweet peppers and drizzle pesto sauce over the vegetables after they are cooked.
  • As a dipping sauce for raw cut veggies. Use it on celery sticks, carrot sticks, or any raw veggie crudites.
  • In salad dressings. Stir into salad as a dressing or use it as the base of a dressing you make by simply adding more lemon juice and olive oil.
  • In soup. For example, you can stir some of the sauce into a cooked soup or a raw soup. Think fresh tomato basil soup for example.
  • As a dipping sauce for baked sweet potato wedges, potato wedges or winter squash wedges. If you’re following the Gerson diet, you can make this recipe and replace the basil with parsley and the olive oil with flax oil. This is a variation on another Italian herb sauce called Gremolata.
  • As an ingredient in another recipe. Try our recipe… Pesto Stuffed Heirloom Tomato.

Vegan Raw Basil Pesto Sauce

Make your own fresh basil pesto sauce using a mini food processor.
Prep Time10 minutes
Cook Time5 minutes
Total Time15 minutes
Course: Main Course
Cuisine: Italian
Keyword: Raw Food, Sauce

Equipment

  • Mini Food Processor

Ingredients

  • 2 Big Bunches (or about 6 cups gently packed) Fresh Italian Basil Leaves washed and removed from the stems
  • 2-3 Cloves Garlic chopped
  • 1/2 Cup Extra-Virgin Unfiltered Organic Olive Oil
  • 1/2 Cup Pine Nuts (or Macadamia Nuts)
  • 1/4 TSP or to taste Sea Salt
  • to taste Black Pepper
  • 2-3 TBSP Lemon Juice

Instructions

  • Prepare the basil leaves by removing the leaves from the stems. Chop the garlic cloves so that they will process better in the mini food processor.
  • Start with processing the basil leaves and chopped garlic with some of the olive oil in the mini food processor.
  • Stop and add the pine nuts, some salt and black pepper. Add some more olive oil and fresh lemon juice to taste and process it further.
  • Keep pulsing the food processor until you have the right consistency and you've processed all the ingredients.
    raw vegan Italian pesto sauce freshly made
  • Be sure to taste to make sure you've added enough salt, pepper and lemon juice.
  • Transfer to a glass jar with tight lid and store in the refrigerator.

Notes

Italian basil is best for making pesto. However, you can replace the basil with other greens or with Italian flat leaf parsley to make other fresh, uncooked herb sauces like Gremolata.

4 Ways To Use Kale In Your Kitchen

We teach that dark, leafy greens are the staple of a healthy diet. To give you some ideas on how to use leafy greens, we’ve put together this post with video demonstrations on how to use the leafy green kale in your kitchen.

Kale is a highly nutritious green, but it also contains antinutrients like oxalates or oxalic acid. Because kale is so nutrient dense, the plant had to come up with a mechanism to protect itself from being eaten by animals and insects and so we have oxalic acid.

One of the principles we have in our kitchen is that we always prepare food with antinutrients in such a way that we attempt to minimize them. For example, we soak (activate) nuts and seeds to minimize phytates and we allow kale to be prepared only in specific ways to ensure minimization of oxalic acid and the proper extraction of the nutrients from the fibrous leaves.

First, here are three kinds of kale:

  1. Dinosaur Kale
  2. Russian Kale
  3. Curly Kale

3 types of kale Russian, Dinosaur, and Curly Kale

We encourage you to buy and use all three of these to add variety to your diet. There are more kale varieties than these three, see what you can find at your farmer’s market or health food store. You can still use these same preparation methods for all types of kale.

In this video Dr. Baylac shows four different ways to use kale in the  kitchen. You can use kale in a smoothie, marinated and massaged in salad, wilted in broth with onions and garlic and marinated and dehydrated to make kale chips.

#1 Add Kale to a Smoothie

Since kale is a rather tough, fibrous leaf, you want to use a method that will help to break down nutrients like blending so all of the nutrients are released from the cell walls and are easier to absorb. Wash 2-3 kale leaves and strip the green leaf part off the rib or stem and add to your blended smoothie. Here is a great recipe for an anti-inflammatory smoothie that contains kale.

#2 Gently Cook Kale in Broth

This method is very easy and does not require a long cooking time. Gently cook chopped kale at low heat in a little broth with onions and garlic. Put the lid on so that it creates steam and to stop the broth from evaporating. Only 3-5 minutes of cooking is required. You will know the kale is ready when the leaves are wilted and became darker in color. If you don’t have broth, water is fine too. Broth adds more nutrients though. You will see in our videos how we are constantly saving vegetable scraps to make broth. This is a great way to use vegetable peels and cut offs.

#3 Marinate & Massage Kale for Salad or Eating Raw

We do not recommend eating kale raw without marinating or massaging it first. Breaking the fibrous leaves down using olive oil, lemon juice and salt turns the leaves into soft, wilted leaves that are much easier to chew properly. When we don’t chew our food well enough, we leave certain nutrients trapped so as to pass straight through the digestive tract without gaining their benefit. Since kale is such a nutrient powerhouse, it’s critical that we predigest and soften the leaves and marinating/massaging is a perfect technique for doing that. Also, delicious!

In this video Dr. Kelsey Becker shows how to use lemon juice, olive oil and salt to massage kale to prepare it to have a soft texture for eating raw, plus minimize the oxalic acid load of the kale.

#4 Make Kale Chips for a Healthy Snack

It’s much easier than you may think to make kale chips. In this video Dr. Kelsey Becker shows how to make kale chips at home. This is such a delicious and healthy snack and the varieties you can create are endless! . You do not have to have a dehydrator, you can also make these in your oven or toaster oven at it’s lowest setting. Enjoy!

We hope that these four ways to use kale will help you to incorporate more dark leafy greens into your diet. SUBSCRIBE to our YouTube channel so that you always know when we upload new videos plus let us know in the comments any questions you may have or videos you’d like us to make.

How to Make Collard Green Wraps

Collard greens are the perfect leafy greens to make delicious wraps from because these leaves are soft and large. Using collard greens for wraps is also an easy way to incorporate more greens into your diet. The options for veggies, pate or dressing you can fill the wrap with are endless. Wraps are also a great way to use leftovers as you can simply pack your leftover salad and pate into your wrap on a busy day.

Collard greens are among the leafy greens that have the highest nutritional value. In fact according to Dr. Joel Fuhrman’s ANDI food scoring system, collard greens are #1 along with mustard greens and turnip greens with a nutrient score of 1000.

ANDI stands for Aggregate Nutrient Density Index. This index assigns a score to a variety of foods on a scale of 0 – 1000 based on adding up most of the vitamins and minerals they deliver for each calorie consumed.

The most nutrient dense foods score 1000; all other foods are then scored relative to them. Collard greens, kale, mustard greens, watercress, and turnip greens score 1000 while Cola scores 1, vanilla ice cream 9, and French Fries 12.

In these two videos we show you two different ways to make wraps from collard greens. This is so easy! Please make this at home and incorporate nutrient dense collard greens into your diet for a strong immune system!

Video #1 – How to Make Collard Green Wraps

In this video Dr. Kelsey Becker shows you how to make wraps from collard greens filled with delicious raw shredded veggies and a sesame seed pate.

Video #2 – How to Fold Collard Greens into a Parcel that Doesn’t Drip

Ever ate a wrap with sauce and juices dripping down your forearms? As delicious as wraps can be, it can require quite a clean up afterwards. In this video Dr. Baylac shows you how to make a veggie wrap with a collard leaf into a pocket so that it doesn’t drip. This is so easy! Great tip… check it out!

Collard Green Wraps

This recipe shows you how to make delicious wraps from collard greens using chopped and shredded raw veggies and pate to stuff the collard leaf. Enjoy!
Prep Time15 minutes
Cook Time5 minutes
Total Time20 minutes
Course: Main Course
Keyword: Raw Food

Equipment

  • Grater
  • Cutting Board
  • Knife

Ingredients

  • 2 Large Collard Leaves washed and dried
  • Chopped Raw Veggies of Your Choice e.g. tomatoes, peppers, mushrooms, olives
  • Shredded/Grated Raw Veggies of Your Choice e.g. carrots, daikon, beets
  • 1 Handful Sprouts of your choice e.g. broccoli, alfalfa, sunflower, etc.
  • Fresh herbs of your choice e.g. cilantro, basil, mint, parsley
  • 1/2 Lemon or lime
  • Pate, dip or salad dressing of your choice e.g. raw chickpea miso, sunflower seed hummus

Instructions

  • Option 1: Remove the hard stem from the collard leaf by cutting it out (see video #1 above).
    How to Make Collard Green Wraps
  • Option 2: Push down on the hard stem of the collard leaf with the flat side of a large knife and break down the hard fibers in the stem to soften it (see video #2 above).
    How to Make Collard Green Wraps
  • Pack the raw cut, shredded and other veggies you have into the wrap however you like it.
    How to Make Collard Green Wraps
  • Add some fresh herbs to give your wrap flavor.
    How to Make Collard Green Wraps
  • Squeeze some lemon or lime juice over the veggies.
    How to Make Collard Green Wraps
  • Add the pate, dip or salad dressing to your layered ingredients.
    How to Make Collard Green Wraps
  • Now fold your leaf into a wrap and cut into two pieces. Serve some more sauce on the side for dipping if you prefer.
    How to Make Collard Green Wraps
  • Or, fold your leaf into a parcel (option 2, see video #2 above).

Notes

If you pack this to go or to take to work for lunch, do not add the sauce or pate into the leaf. Instead take the sauce/pate on the side. This will prevent the wrap from getting soggy. 
PATE RECIPE:
Sunflower Seed Hummus 

Brazilian Avocado Mousse

We are enjoying a full season of avocados and would like to share this recipe that’s inspired by a Brazilian drink that’s made from milk and honey. This recipe has been adapted for vegans by making hemp seed milk and adding lime juice. It tastes delicious and takes only three minutes to make.

Avocado, a fruit not a vegetable, is high in healthy fats, fiber, vitamins and minerals like potassium, and is low in carbohydrates/sugar.

Brazilian Avocado Mousse

Prep Time20 minutes
Total Time20 minutes
Course: Breakfast, Dessert
Keyword: Raw Food, Smoothie
Servings: 2 servings

Equipment

  • High Speed Blender
  • Citrus Reamer

Ingredients

  • 1/4 cup hemp seeds hearts, shelled
  • 12 oz fresh coconut water or filtered water
  • 1 medium avocado
  • 1/4 cup fresh lime juice
  • 2 tsp honey

Instructions

  • Blend the hemp seeds and the coconut water (of filtered water) together in a high speed blender until a smooth milk forms. 
  • Add the avocado, lime juice and honey and blend further until smooth and foamy.
  • Pour into glasses and garnish with lime rind.
  • Serve with a spoon, cold.

Better Than Egg Nog

The perfect, raw, vegan Egg Nog for the Holidays. Truly delicious with a rich, heavy, silky texture. Especially with a generous sprinkle of freshly grated nutmeg on top, this is better than Egg Nog.

Servings: Four small glasses, or two large glasses

Ingredients

  • 3/4 cup soaked cashew (soaked at least 2 hours)
  • 1/2 cup coconut meat (soft to rubber meat, not too mature)
  • 2 cups water (can be adjusted based on desired thickness)
  • 1 TB coconut oil
  • 2 TB maple syrup, or to taste
  • 1 tsp vanilla extract
  • 1/2 tsp cinnamon
  • 1/2 tsp freshly grated nutmeg
  • Pinch of ground cloves
  • Pinch of Himalayan salt

METHOD:

  1. First, blend cashew, coconut meat, and water until silky smooth.
  2. Add coconut oil, vanilla and maple syrup, blend, taste, and adjust sweetness if desired.
  3. Finally, add all spices and salt, blend to combine.
  4. Chill egg nog in the fridge for a few hours before serving.
  5. Serve in glasses with cinnamon or freshly grated nutmeg to garnish.

Pin to your recipe board and share

raw vegan egg nog recipe

Almond Milk

Prepare your own fresh Almond Milk at home in just a few easy steps!

Ingredients:

  • 1 Cup Raw, Organic Almonds
  • 2 Cups Filtered or Spring Water

Supplies:

  • Medium sized ceramic or glass bowlmaking-almond-milk
  • High powered blender like Vita-Mix or Blend-Tech
  • Cheesecloth or other straining cloth; make sure the piece is large enough to span across the bowl with some extra fabric hanging off the edges. Or, you can use a nut milk bag if you have one.
  • Large Mason jar with lid

Yields: 2 cups, simply double or triple the recipe for more milk

METHOD:

  1. Soak almonds in filtered or spring water for at least eight hours or longer. It’s often easiest to soak it overnight and make the milk first thing the next morning. This works especially well if you are using the milk in your breakfast smoothie. Simply soak in a glass jar or in any other covered glass container.
  2. Pour off the soaking water from the almonds.
  3. Add 2 cups of filtered or spring water to a high speed blender and add the soaked almonds to that. The general ratio is 2:1. Two cups of water for 1 cup of nuts, 4 cups of water for 2 cups of nuts, etc.
  4. Blend at high speed for one minute or until completely smooth.
  5. Position the cheesecloth over the ceramic of glass bowl and push gently in the center of the cheesecloth to make a shallow divot. Otherwise, get your nut milk bag ready.
  6. Pour the blended almond liquid from the blender through the cheesecloth or nut milk bag. If you’re using a cheesecloth, twist the top of the cheesecloth to tighten around the remaining almond material, twist tightly and squeeze the rest of the liquid out into the bowl. Or, twist the nut milk bag to squeeze all the milk out.
  7. Pour the milk from the bowl into a large mason jar with lid and store in the refrigeration for up to 4 days. Best to use same day and that’s why it works well to make it fresh every morning and to place the nuts in water for soaking right before you get ready for bed.

TIPS: 

  • The leftover dry almond meal in the cloth or bag can be used to make other recipes, such as raw vegan cake or pie crust.
  • Add half a cup of frozen blueberries and 2 washed kale leaves back into your high speed blender, add your almond milk and blend again for a breakfast smoothie. 

Little Known Ways to Fall In Love With Soursop

By Dr. Maya Nicole Baylac

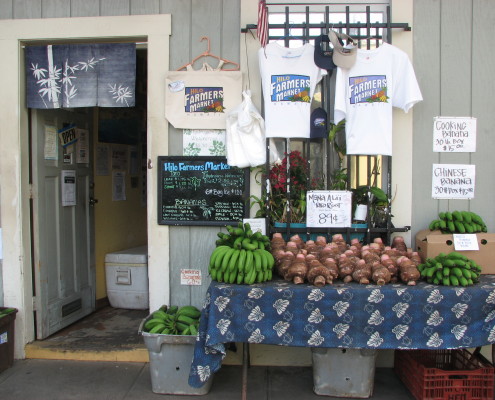
Fifteen years ago when I began my practice and medical retreat center here on the Big Island of Hawaii, I discovered the Hilo Farmers Market to shop for organic, fresh fruits and vegetables for my programs. For those of you who don’t know, utilizing and applying the medicinal value of food has always been and still is a key pillar in my medical approach.

Hilo Farmers Market

I remember finding myself in absolute awe back then over the unusual, new, tropical and exotic fruit I was discovering.

One day I was standing by the colorful produce display, looking at this spiky, irregularly shaped, strange looking green fruit when I heard the person standing next to me say, “This is soursop. My wife got cured from cancer eating soursop and making tea with the leaves”. Naturally this got me very excited and I bought a soursop fruit to take home that day.

Later I did some research on the fruit and found many more testimonies on soursop’s ability to fight cancer. I started serving soursop at my retreat programs to my patients on a regular basis.

The botanical name for soursop is Graviola Guanabana. It is a small, evergreen tree and the leaves, the soursop fruit, seeds, graviola capsules, and stem can all be utilized in traditional medicine or as food. The leaves from the tree for example can be made into tea.

soursop tree

Small evergreen soursop tree with fruit

What Does Soursop Taste Like?

Although taste is subjective, I personally find soursop delicious. It has a sweet and sour taste and is extremely juicy. The downside is that it takes time to prepare if you are committing to cleaning the entire fruit. Soursop has hard seeds packed individually in tight fibrous pods. Some soursops are the size of a football!

soursop pods and seeds

The white meat is extremely juicy and has a sponge like texture

Once the fruit peaks, you have to either enjoy it right away or prepare it and store it in the freezer to be used in batches later.

Today, after fifteen years of consuming soursop on a regular basis, I found a new efficient way to deseed the soursop and I’m very excited to share this method with you.

Choosing the Fruit

Choose a ripe fruit. It must be soft, but firm. It should have green looking skin or be slightly brown in places. I buy soursop soft rather than hard, because I had to throw away several of them that were picked too early and never ripened. There is a way to identify the stage of maturity of a hard unripened fruit with the spike direction and the shininess of the fruit, but I have not mastered that skill yet. I am gearing at being an expert soon and will keep you posted.

Tips for Cleaning and Eating Soursop

The Best Way to Clean Soursop

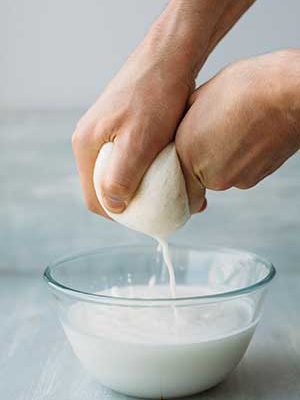
You will need a nutmilk bag and a large glass bowl. Clean your nails and wash your hands thoroughly before you get started.

INSTRUCTIONS:

  • Wash the fruit and place in the bowl.
  • Separate the soursop by hand into two pieces.
  • Remove the outside stem and its long central internal extension in the core of the fruit.
  • Remove the green skin with your fingers running your fingers between the skin and the fruit, it should peel off easily and the small hard granule should stay attached to the skin.
  • Place the white segmented pieces of soursop in the nut milk bag pressing and massaging the content through the closed bag to extract the pulp until only the seeds and their pods are left in the bag.
  • Discard the fibers and the seeds from the bag.
  • Save the creamy white pulp to consume right away or freeze for the future.

Recipes & Ideas for Eating and Preparing Soursop

  • You can use the soursop’s white creamy pulp just as is as a dessert. It looks beautiful and tastes deliciously sour and sweet.
  • You can use soursop for your morning green smoothie as a single fruit basis or with another fruit. Some people think it adds a yogurt taste to the smoothie.
  • You can freeze it and make ‘ice cream’ or sorbet in the future. I learnt this when I travelled in Tahiti and found restaurants were serving soursop ice cream. For those of you who have either a Norwalk or Champion juicer, you run the frozen fruit through the grinder fitting of the juicer and then you end up with satin texture frozen fruit cream. It is a fast and tasty recipe that will also help you to prevent or fight cancer.

If you live or have traveled in any tropical climate like Central America, Thailand or The Philippines, I am sure you are familiar with the delights of soursop and have many of your own ways to prepare and eat it.

For myself I have found that using a blender to prepare soursop will ruin its smooth creamy texture. I’ve experimented with making smoothies with a combination of spices such as vanilla, nutmeg and cinnamon.

In the end I prefer it plain and cleaned through a nut milk bag. Since soursop is seasonal and it’s abundant when in season, I choose to clean and prepare extra soursop during the season and freeze it for later use. A favorite treat is to serve it to my patients as a sorbet or frozen desert.

ENJOY THE FRUITS OF THE EARTH
FOOD IS MEDICINE

Raw Celery Root Soup

Celeriac Celery root is also known as celeriac and celery knob. It has leaves that resemble familiar celery stalks, which are attached to a light colored tuber that grows underground. Celery root imparts the taste and aroma of celery to recipes it’s used in. However, unlike common celery, celeriac is a vegetable in the carrot family, and as such it contains falcarinols. Falcarinols are anti-oxidants also found in carrots that protect against cancer. Celeriac is a good source of vitamin K, which is involved in promoting bone mass, and it may limit brain damage in those with Alzheimer’s disease. Celery root is a good source of minerals such as phosphorus, iron, calcium, copper and manganese, and it contains vitamins B and C, all of which are necessary for proper cell function.

Celeriac may be used in the same way as other root vegetables. It can be served raw in coleslaw and salads, added to aioli as a condiment, or grated as a garnish.

TIPS FOR INCORPORATING CELERY ROOT IN YOUR DIET:

  • Cook and mash like mashed potatoes, or cook with potatoes, turnips, onions and mash together
  • Cut the root in pieces and roast
  • Make Dr Max Gerson’s Hippocrates Soup
  • Prepare a fast, nutritious raw food soup in your blender
  • Grate or julienne and use in salads or as garnish

Here follows a quick to make and very easy raw soup:

Makes 2 Servings

Ingredients:

4 Cups Peeled and Julienned Celery Root
1 Cup Celery Cut Small
2 Cups Water
1 Clove Garlic
4 Dates Soaked until Soft
2 Tablespoons Olive Oil
1 Tablespoon Lemon Juice
Salt to taste

METHOD

Combine all ingredients in Vitamix for best results. If you don’t have a Vitamix, a high speed blender will work but the soup will remain slightly grainy. Garnish with grated raw vegetables to add body to the soup.

Celery Root Soup

Glossaryhttp://www.dreamstime.com/stock-photos-cutting-carrots-image14860863

Julienned: To julienne food means to cut and slice into thin strips about the size of matchsticks, but the size can vary depending on whether you are using the julienned vegetable for garnish, for crudites, in salads or in cooked dishes.